Saturday, March 26, 2011

Lundby en France

I wanted to let you know about two websites featuring Lundby, both created by collectors in France.

Valérie's website showcases her fabulous collection of Lundby, Lisa, Hanse, and Caroline's Home houses (among others) dating from the early 1970s (click the link after "English translation here" for English). Valérie gives a detailed history of each brand and also talks about her own experience collecting.

Valérie's 1970s Gothenburg
Ulla-Maija's website shows the treasures in the doll and teddy bear museum she has set up in her home (click on the British flag for English). Her collection spans the late 1800s to today and includes a beautifully furnished 1960s Gothenburg (here's a photo, as promised for those of you who voted for "earliest Lundby and 1960s" in my survey).

Ulla-Maija's 1960s Gothenburg
Both sites are now available in English (thanks to a Lundby fanatic translator--me!). I hope you enjoy visiting Valérie and Ulla-Maija's sites!

Monday, March 21, 2011

SURVEY :: Results are in

A big thank you to all who cast a vote for their favorite Lundby era!

To recap, my super-scientific poll asked you to pick your favorite period of Lundby. The six choices were earliest Lundby and 1960s, 1970s, 1980s, 1990s, modern Lundby, or "I love them all!"

The top two replies were 1970s, with 46% of the vote, and earliest Lundby and 1960s, with 33%. In third place was "I love them all!" with 16% of the vote.

In celebration of the top-ranked era, I'd like to show you some of the things I love most about my 1970s Lundby house.


When I first saw the wooden rails on the bottom I thought they had been added by a previous owner, but I now know better--thanks to Lundby expert Elisabeth in Sweden. Like the 1960s Gothenburg, early 1970s models had wooden rails with holes for screw-in legs. I haven't looked too hard for a set of legs, as they tend to be very expensive and I wouldn't use them since my house sits on top of extensions.


I also love the early 1970s New Scandinavia modular bedroom set. There's just something about that psychedelic pink, red, and orange bedspread and how it looks against the crazy brown floral wallpaper...


And what's not to love about the bright orange sectional sofa with clashing throw pillows? Pardon the technical difficulties--the matching corner shelf won't stay stuck to the wall!


Speaking of clashing colors, I really dig the contrasting blue and orange of the 1970s Leksand and Scandia furniture, and how it looks against the blue dining room floor. Aren't the Swedish dala horse decals a sweet touch?


More contrasting colors in the bathroom, with the butterscotch yellow fixtures against a red tile backing. I also love the sconce on the sauna. The thin slats of wood add great detail.


Those of you who voted for earliest Lundby and 1960s, don't dismay. I'll be back soon with a beautiful collection I think you'll love!

Thursday, March 17, 2011

Happy Purim!

Martha in Jerusalem has decorated her Lundby Stockholm for Purim. She sent me these photos of her Lundby family in colorful costumes celebrating under signs reading "Purim Sameach" (Happy Purim).


On the table are a Megillah scroll (Book of Esther), plates of hamantashen (filled pastries in the shape of Haman's three-pointed hat or triangular ears), and a brass gragger, or noisemaker used to drown out the name of wicked Haman.


Thank you for sharing, Martha. A happy Purim to one and all!

Friday, March 11, 2011

Lundby transformer manuals


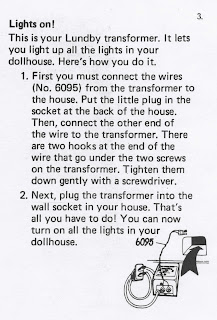
I had fun reading through this little manual that came in the box with one of my transformers. The first two pages are warnings--boring but important!


The next page talks about how to connect the transformer to the dollhouse. Hmmm... Wouldn't it be easier to connect cord 6095 to the transformer BEFORE plugging the other end into the house?


Now things get a bit complicated! I had never thought of connecting another cord 6095 to the transformer for an extension. Instead I generally insert the tiny plug from the transformer into the bottom-most extension, then use bridging cords (6097) to connect extension to extension and extension to house.

Again, the manual suggests inserting the plug end of 6095 into the extension BEFORE screwing the tiny metal forks into the transformer.


The manual goes on to explain how to connect the middle extension to the bottom garage extension using a bridging cord (6097). Then we learn how to hang lights and adjust their height.


Things get a little crazy again as we learn how to change bulbs! The manual claims that the "lamps shouldn't break" and should "burn for around 2,000 hours." Wow! In my experience those tiny bulbs can easily overheat--which is why it's not advisable to leave a transformer plugged in for an extended period of time.

Interesting that the manual has us cutting the cord of the burned-out bulb, rather than removing the plug pins so the wires can easily be pulled out. It also says to use a new plug (6192) rather than reusing the original one.


Next we learn how to power more than one lamp on the same plug and make lamps reach farther using single- and multi-socket extension cords (6512 and 6521).


The last page explains how to use extension cords in a piggy-back fashion to connect garden lamps. I love the tip about keeping things looking neat by hiding the cord under a hedge!


For more tips, take a look at these old leaflets: